Showing posts with label gift. Show all posts

Tuesday, 8 December 2015

A crafty start to Christmas is the way to go

It's official! The tree is up and the buzz of calls asking what to get for Turtle has started. I am feeling surprisingly calm and, unbelievably, festive!

Our quirky Christmas tree
A colleague sent me a link to this blog a few weeks ago and it prompted some action that has made me feel much more at ease with the start of the silly season. I decided to scavenge a branch from somewhere and create our own version of a gift tree.

It also motivated me to email my family and suggest some gifts that would be meaningful and appreciated. Since Turtle is becoming quite aware that the family is so far away photographs are an important way to stay close, no matter how busy we all are and how big the time difference is. I have suggested that the family send some recent pictures accompanied by a little story about what was happening when it was taken. I have been meaning to print some off myself for months and never get around to it.

Otherwise, we have requested that they send a promise or pledge to do something nice with her throughout the year. I am about to start making some of my own to add to our gorgeous tree (pictured above). I have seen so many lovely Christmas tree ideas this year that are quite artistic and original. Here is a link to a few that are quirky and gorgeous.

I also suggested that if anyone preferred to buy a gift then to make it small and preferably secondhand or fair trade so that it would be giving back to the community and generally be less wasteful.

The mixture of lovely crafty ideas that have been happening, along with a proactive approach to asking what we would like, seems to have made Christmas feel less daunting this year. 

I am also feeling much more prepared to meet the relatives halfway and let them buy something new, as long as it is something that Turtle needs. They deserve to be able to give something just as much as I deserve to be able to reduce the wastefulness of what we receive.

I hope this calm, happy and balanced feeling will stay with me as the month continues... We will see! I will be sure to report back and let you know.

How has your Christmas season started? Are you feeling annoyed and jealous after reading this blog because it been a stressful? Or are you also feeling surprised that you've also managed to start things off on a good note? I sincerely hope it is the latter.


Thanks for reading, I'm linking up with EssentiallyJess for #IBOT today.

Lizzing Lightly

Wednesday, 6 May 2015

Crafting eye pillows for special people in your life: A tribute for World Ovarian Cancer Day

Although I made these eye pillows late last year I held off on writing this post since I gave one in our family's Kris Kringle and I didn't want to blow my cover. Sadly I am sharing it because the recipient of my secret gift has passed away. My aunt was quite sick with ovarian cancer at Christmas. I don't think any of us realised just how sick she was though. She died within 2 months. Since she was only 49 it has been a stark reminder to us all that life is fleeting and you can't know what might be around the corner.

My gorgeous aunt at our wedding 2011
I love eye pillows and thought that it was an appropriate gift for my aunt while she was having chemotherapy. I discovered them during rest time (shavasana) in yoga and found they help me to relax and unwind. I liked the idea of making an eye pillow since it would be more personal. We also had a $20 limit for our gifts so it helped me to come in under budget while still being able to give other things as part of the gift.

Since my sewing skills are rather lacking, however, I was a bit hesitant about how it would go. Luckily a friend had recently made herself one, although she used a sewing machine. She encouraged me to do it and said it would be easy. Now that's my kind of project!

I went to the fabric store to buy some silk. That's right, I went straight to the silk. The eye pillows I had previously used in yoga class were silk and I loved the feel of the cold soft fabric on my eyes. Once I started looking I realised that the silk could have been spun by child labour for all I knew. I didn't feel comfortable buying new fabric either. Surely there was a more ethical way to make my gift?


The local op shops were my next step to see if they had any silk items that I could upcycle for my project. I was in luck! I found the most beautiful fabric in a dress that cost about $25 from memory (note: since I could make multiple eye pillows I decided that adhered to the Kris Kringle rules). I was sad to cut it up but the style didn't suit me at all. Then I was set to start. I am glad I chose silk because, apart from being lovely on, the silk ended up being very easy to sew.

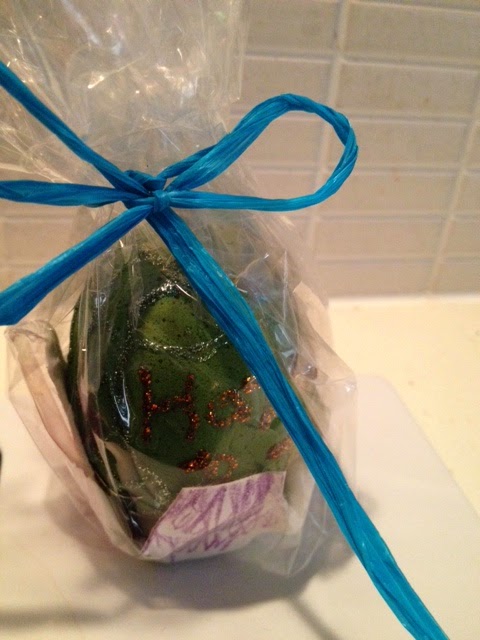
I cut the fabric in a long rectangle of 10 x 25cm to make sure there would be room for my rather unskilled sewing errors. Then I hand sewed three and a half of the sides, turned it inside out and filled it with linseeds. I was careful not to overfill it since it wouldn't feel as nice or shape as nicely to the face. I also added some dried lavender from the garden for a slight scent to aid with relaxation. I only added about 2 teaspoons of lavender so that it wasn't too strong but some blogs recommend adding much more. After filling it, I sewed the last part up and it was done. I made an extra eye pillow for myself at the same time.


I have been very happy with the mine, despite it being a tad wonky. I use it after every yoga practice during shavasana. I encourage you to give it a go - give one to someone special in your life and keep one for yourself.

This Friday is World Ovarian Cancer Day. Learn the facts about ovarian cancer and share them with at least 5 people to try and raise awareness of ovarian cancer amongst women everywhere. To find out more about ovarian cancer and the symptoms follow this link to Ovarian Cancer Australia's website. 

My aunt was diagnosed with ovarian cancer in late 2013 and died in February 2015. She stopped work immediately after her diagnosis and had two prolonged chemotherapy treatments. It has been a terrible loss to our family, particularly for her older siblings. My mum and uncle. May she rest in peace and be lovingly remembered always.

Wednesday, 1 April 2015

Real Homemade Easter Eggs

This was a simple, fun and cheapish activity that I did to make unique Easter eggs for Turtle and her mates at mum's group.  I also sent a couple to my niece and nephew in Adelaide.  They are real eggs that have the inside blown, they are dyed green, filled with sultanas and chocolates and then decorated and wrapped.

Wrapped and ready to go - Real Homemade Easter Egg

How to make Real Homemade Easter Eggs (Total 3 hours)

Step 1: Blow the eggs (30 minutes)

This got easier with each egg and I didn't use a scalpel as suggested in the link, just a metal skewer. It was really easy to jab a hole with the skewer and make it bigger.  I left the eggs to dry in the carton with a piece of paper towel to soak up any water.  It would make sense to dye the eggs immediately (step 2) if you want them to have colour and then dry but I did it the next day.

Step 2: Dye the eggs (30 minutes)

I made four times the the recipe provided in the link to immerse eggs completely and gain better coverage in half the time.  Using blown eggs made it easier because they fill up with dye water and sink... so no stressing about them bobbing around in the dye and getting a patchy coverage.  I could fit three eggs into the bowl too so that cut down on the time it took considerably. The dye is quick to take but I decided to keep each egg in for about 5 minutes on each side (as suggested) to get a good effect.  The plain eggs seemed to absorb the dye much better than the speckled eggs.

Step 3: Fill the eggs with treats, decorate and wrap (up to 2 hours)

This was the most creative part of the project. I found it quite hard to cover the holes at the end of the eggs with stickers as suggested in the link. They just wouldn't stick! I luckily bought some stars that seemed to stick down the bigger stickers that struggled to grip around the egg curves - especially on the speckled eggs which have a rough surface. I decorated a couple of the eggs in egg cups which meant I got much better coverage for the decorations. However if I waited until each dried (around 5 hours) then it would have taken forever to do 8 (ahem, after my accident - 7!) eggs. So I laid out newspaper and decorated the eggs lying on that. They stayed in place really well and dried without smudging. I found using glitter paint pens really easy.


To wrap I cut up the egg carton into individual holders and wrapped the eggs with recycled cellophane and ribbon.

Lessons learnt

I would probably glue stickers or decorations over the holes next time to make sure they stick properly.  I didn't want to get out glue this time since I thought it might get too messy but I think it is worth doing it so they stay on.

Be careful and don't forget you're working with fragile materials! Haha, lesson learnt by dropping and smashing one of the eggs.


Costs

I had the eggs in the fridge already and was, coincidentally, planning to make Japanese omelettes so that meant they were all eaten straight away.  I had to buy the metal skewers (~$7) but they will definitely be useful for many barbecues and meals to come.  I had green dye in the house (from a St Patricks Day party a couple of years ago) and so decided to keep things simple and make all of the eggs green.  Granted they did look like big olives until they were decorated but that didn't worry me.

I bought some stickers to cover the holes in the blown eggs and some glittery pens to write names and decorate the eggs for a total of $17.50.  The glitter paint pens will definitely be used for many more craft activities to come.  I also bought some mini chocolates (M&M's) for $2.50 to put into the eggs with sultanas that we already had at home.

In total the project cost me just less than $30 for 7 personalised eggs (originally 8 but I dropped one) and took a total of three hours.

Sustainability

I am happy that I saved on waste by not buying prepackaged chocolate eggs or foil wrapped ones. The sultanas were organic so that is a healthy and wholesome treat. I think the mini M&M's need to be changed for another treat that is more sustainable if I can find one. I will have to think about what I could do instead.  Suggestions are welcomed!

Overall I was quite happy with this little project, the treats are pretty healthy and the egg is quite exciting to crack into.  I highly recommend you give it a try at some point.

What do you think? Do you like the idea of real homemade Easter eggs?


Lizzing Lightly